Tuesday, 31 July 2012

Peach Leaf Pie : "TWD : Baking with Julia"

With the US Presidential elections looming ahead, here's a bit of trivia for you. They say the most-ordered dessert by US presidential candidates whilst on the campaign trail is... Pie!!! President Obama loves his pie and according to his pastry chef, Bill Yosses, Banana Cream Pie is his favourite. In fact, such is the appeal of the humble pie for the Americans, that his rival, Mitt Romney, has not only declared his love for pies but was also seen rolling out one at a recent campaign stop!

Sitting in India and reading all about America's love affair with pies, helps me understand why this week's "TWD: Baking with Julia" choice of recipe - Blueberry Nectarine Pie, had such popular backing!!  


The original recipe calls for a pie dough much similar to a short crust pastry but instead of an all-butter dough uses a combination of butter and vegetable shortening to achieve a flakier crust. The book uses a filling of nectarines and blueberries for this double-crusted pie.

Since, we get neither nectarines nor blueberries in India, I went with peaches. Not comfortable with using vegetable shortening, I decided to go for an all-butter crust, much like a pate brisee.

And as you can see from the photographs, I had a lot of time on my hands to attempt a leaf pattern for the top layer of the pie. It is an idea that I got from this book by Martha Day.  


I already have a 'tried-and-tested' short-crust pastry recipe that's been used to make these beautiful galettes and tarts. I was keen to see if this pie dough improves upon that. Honestly, it did not!! If any thing, it was a tad too delicate to work with but that could have been largely due to the high humidity in the air these days. But even on the taste and texture front, I'd prefer the recipe I already use.

The peach filling, on the other hand, was a good choice. The hint of lemon juice added to the filling ensures a certain balance in flavour.


But, truth be told, the high point of this pie for me was that leaf pattern I attempted. There is no denying its visual appeal. While it may not be something you attempt for a regular, family dinner, it does have that 'wow-factor' to impress the guests at a dinner party!! A word of caution though, attempt it only if patience is one of your virtues!!


There is no denying the appeal of a good pie and that's what this pie was. It just has this warm, cosy and comforting feel about it that lends itself naturally as a dessert of choice for a get-together with family and friends. No wonder Americans love their pie!!

Wednesday, 25 July 2012

Trifle with Plum Compote and Vanilla Custard

Events in Britain have been capturing our news space for some time now. It started with a certain Royal Wedding last year, then the Jubilee Celebrations over the summer and now for the 'Greatest Sporting Event' of our times. So, in the spirit of the Olympics due to be inaugurated in London day after tomorrow, I share with you my version of the classic English dessert, the Trifle. It has even been listed as one of the 'Top Ten Great British Dishes'!!

A trifle is a layered dessert, that starts off with a layer of cake, soaked in some spirits, followed by layers of fruit (jam), custard and cream. The best part of it is that you can play around with your choices on the type of cake, fruit, custard or even spirits that should be used.


So, when it came down to me deciding on the layers of my version of the trifle, I knew there had to be fresh fruit. I zeroed in on plums, the one stone fruit that I have not worked with this season. To figure out my other layers, I looked for flavours that paired well with plums. I came across this beautiful resource online, that informed me that plums pair well with cinnamon and vanilla.

Keeping that in mind, I decided on a regular, vanilla pound cake and a vanilla custard for the other layers. As for the plums, I found this gem of a recipe for a plum compote by model-turned-cook book author, Sophie Dahl. The recipe caught my eye, not only because it uses fresh plums, but more so because it is flavoured with cinnamon and star anise.


A trifle is about getting all the components ready, because once done, they just have to be layered. No fancy technique really!! The plum compote takes no more than 15 minutes to make. In the interest of time and convenience, you can cheat with this recipe and use store-bought cake and 'custard-powder' custard. Stop wrinkling up your noses, all ye purists out there!!!

A traditional trifle is made in a large bowl. But, there is something rather ungainly about a trifle when it is spooned out of the bowl and put on a plate. There just isn't a pretty way of doing it!! So, with my penchant for individual dessert servings, I went for individual trifle glasses.


My earlier encounters with trifles had left me unimpressed with their insipid layers of cake, jelly, custard and cream. I was a trifle-sceptic going into this dessert. But, such is the power of fresh fruit in a dessert that I am now a surprised convert.

That plum compote is what makes this trifle a winner. The slight tart taste of the compote on account of the plums contrasts beautifully with the other sweet layers and prevents this dessert from being cloyingly sweet. The addition of cinnamon and star anise adds a completely new, exotic dimension to a regular fruit compote. The vanilla custard harmonises and lightens the dessert by toning down the intensity of the compote.

Even if you decide not to make this trifle, I'd tell you not to miss out on the plum compote. It celebrates the fruit beautifully and can be paired with Greek yoghurt or ice-cream for an easy and light, summer dessert.


The trifle with its layers of different textures and flavours in a way represents the multi-cultural and multi-ethnic society that is modern Britain today. And, I think, no other city in Britain celebrates that better than London - an apt choice to host an event that celebrates "the spirit of friendship, solidarity and fair play"!! Nothing more to say except "Let the Games begin"!!!

Sunday, 15 July 2012

Chocolate Blancmange

June and July are 'back-to-school' months, here in India.  The school buses get ready to hit the roads, mothers grateful to get their peace of mind back and the kids get set to immerse themselves in a mundane routine that in a decade or two, they will look back at as straightforward and uncomplicated.

It is that time of the year when little minds have to make BIG decisions like choosing the appropriate school bag, stationary, lunch box and other such accoutrements. The underlying principle guiding these decision ... "Neighbour's Envy, Owner's Pride"!! For some reason, I remember the pencil box, that little box that stored all your stationary essentials, playing a big role in cementing your 'cool quotient' amongst your peers during the wonder years!! Do you have any special 'back-to-school' memory??


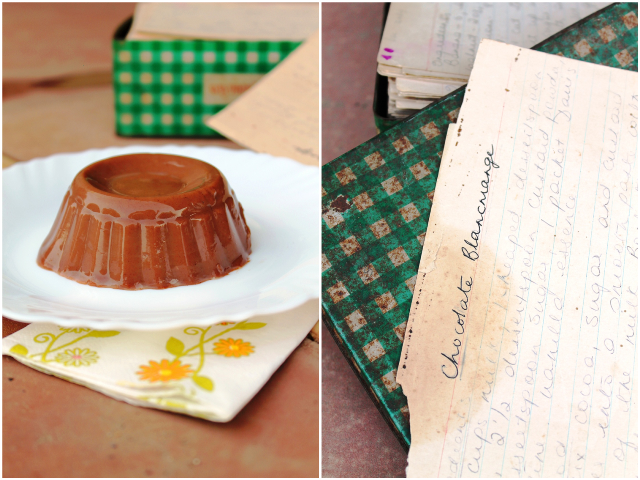
So, in the spirit of things, I share this dessert, Chocolate Blancmange, which was a regular for me and my sister through our school years. I found it while rummaging through my mother's recipe box. She has this green-checked tin box that is a treasure trove of hand-written recipes, on pieces of paper, that she has collected over the years. Today, the box has rusted around the edges, the paper has yellowed and the ink might have faded but the recipes, a mix of the traditional and the contemporary, remain timeless!!

This dessert is not for the purists but for the busy, time-strapped mother who wants to make a post-dinner sweet treat for the kids. This recipe is a mix of milk, cocoa, custard powder and sugar that is heated and then set with gelatine. Poured into moulds and then inverted and revealed right in front of the child, it has the makings of a winner that will remain embedded in your memory forever!! Look at the photograph of the stained and torn paper of this recipe and you'll get an idea of how popular it was at home!


So, after all these years, what's the verdict on the dessert. Well... it ticks all the boxes of a kiddie dessert.. it is sweet, chocolaty and milky, shiny with a slight wobble and most importantly, has an adult-sounding fancy-schmansy name!!!

While it is just as how I remember it, my adult palate does notice two things about the dessert that a child could not care about. Firstly, do keep in mind that the flavour of the cocoa powder that you use will come across very clearly. And secondly, what I really appreciated this time was that this is a very light dessert.. honestly, it was almost like having chocolate milk, albeit set with gelatine!!


If you have children around or are looking for a dessert that evokes the basic flavours and tastes of childhood, do give this dessert a shot. This is after all a simple, basic, fuss-free, uncomplicated, clean, comforting dessert....pretty much like childhood itself, I'd say!!

Tuesday, 3 July 2012

Roasted Almond and Chocolate Chip Biscotti : 'TWD : Baking with Julia'

With their Italian heritage and the unique twice-baked process, biscotti have been on my mind ever since I've started writing this blog. They almost seemed like a grown-up, refined version of the basic, humble cookie that I usually bake. And what better than a Julia Child recipe for my first biscotti post!!

Hazelnut Biscotti was the recipe chosen for this fortnight's TWD:Baking with Julia post. With hazelnuts not that easily available in India, I decided to go with the classic combination of roasted almonds and chocolate to flavour these biscotti.


For those wondering why biscotti are called 'twice-baked' cookies, it is because at first the dough is baked in a log shape, then sliced and baked again to achieve their characteristic crunchy texture.

What I did not know and the recipe taught me is that these cookies have no butter or fat in them except that which is present in the eggs. It is this lack of fat that makes these biscotti in Dorie Greenspan's words "unexceptionally dry and crackly"!!


For all the talk about the technique behind these biscotti, I found them really simple to make. The recipe for the dough followed the simple technique of mixing the dry ingredients with the wet - a technique you will come across with a number of recipes that I post on this blog.


I've come to the conclusion that recipes from this Julia Child book rarely disappoint and this one is no exception. Not too sweet in taste, these biscotti engage you with their crunchy and crackly texture. The roasted almonds along with the chocolate chips were an excellent addition to these moreish biscotti. Roasting the almonds intensified their nuttiness and elevated these cookies from the ordinary.

With their crunchy texture, these biscotti are made to be dipped, making them perfect with a cup of tea or coffee. Make a batch of these highly addictive biscotti and I reckon that neither will you just stop at one nor will they last long at your home!!


As for me, I am writing this post on a Sunday evening where the dark clouds that have been gathering all afternoon are finally giving way to some much-anticipated rain. I'm comfortably ensconsed at home, by the window, with a beautiful book, a steaming cup of coffee and a jar of these scrumptious biscotti to keep me company. Afterall, someone did say, "Life's pleasures often lie in the simplest things!!".

Sunday, 24 June 2012

Cherry Frangipane Tarts

When I first started blogging, I did not have a clue on how this blog would shape up. All I knew was that I loved baking and I wanted to have my little corner where I could share my experiences, as I experimented and expanded my baking repertoire. I wondered, at first, on how I would decide which recipe to tackle and worried that I would overload on chocolate-centric recipes. After all, I came into this blog with one chocolate cake, one chocolate brownie and one chocolate-chip cookie recipe in my baking kitty!


And what a revelation it has been .... apart from the baking experience, I just did not anticipate how much I would enjoy weaving these little stories around my baking, whether it be with my writing or with the photographs that would accompany them. I've amazed myself as I've found inspiration for my posts from food memories, places, books and the seasons.

I found myself repeatedly turning to the fruit in season for inspiration and searching for recipes that incorporated them. I suspect that has much to do with the changes that I have brought about in my own diet over the past few years, to increase my intake of fresh and seasonal produce, which brings me to today's post.


We are right now in the middle of stone fruit season which occupies a tiny space in India's fruit calendar. Much of India lies in the tropics, except for a few northern states  that have the climate to grow these fruits. So when the plums, peaches and cherries make their annual appearance in the fruit market, you have to move fast or the season will just pass you by!!

The cherries from Kashmir, our northernmost state, have arrived and I knew I had to make something with them. I zeroed in on these tarts. Time and again, I have come across various frangipane tarts that have fruits in them and these juicy, deep red cherries called out to me!!

These tarts start off with a short crust base with a frangipane filling, which is essentially a mix of almond meal, vanilla, eggs and sugar. They are then topped of with pitted cherries which get immersed in the filling as these tarts bake!!


Before I go on to tell you how these tarts tasted, can I just to tell you that these tarts looked beautiful and dainty. They had me captivated the moment I pulled them out of the oven, with the dark cherries peeking out of the puffed-up golden brown filling, .

And they did not disappoint on the taste front either. The pastry was the same one I used for these galettes, a tried and tested one, that produces these lovely, flaky tarts. The frangipane filling with a slightly nutty taste and a delicate, vanilla flavour is a winner.

The juicy cherries, in my opinion, provide a balance of freshness as well as they lighten up a filling that could otherwise risk being a bit too rich, owing to the almond meal. And the best part, these tarts are not cloyingly sweet and the jam glaze on top finishes them off perfectly!!


What I would change the next time I make them and I ask you to keep in mind is to add more cherries. These are, after all, cherry tarts and you would want to encounter this juicy, beautiful fruit with every mouthful that you take. So, my suggestion, don't go stingy on the fruit!!

For someone who is increasingly enjoying baking with fruit, I can't stop praising these beautiful tarts that would make a perfect tea time treat. Pair them with cream or custard and they'd make a delightful dessert for a summer meal. Cherries are in season across much of the world right now, so try these before the season ends!!

Tuesday, 19 June 2012

French Mango Cake : "TWD : Baking with Julia"

When it comes to recipes from the Julia Child baking bible, I follow the recipe to the last word. I am still a novice baker, finding my way around and haven't yet developed the confidence to play around with recipes. It's also my way of giving the true blue baking recipes a shot, something I would normally be tempted to give a miss considering all the fuss and emphasis on technique that usually accompany them. But then there are recipes like today's where adapting the recipe has been the only way!! But am getting a bit ahead of myself...


This week's recipe for our bake-together was the French Strawberry Cake. That's when I faced my first hurdle. Strawberries are long gone from the Indian market with January-March being strawberry season for us. So, I turned to the one fruit that takes over our fruit markets during the summer - the mango!! I figured its soft texture would make it a suitable substitution for strawberries and a good seasonal choice!!

"What's french about this cake??", you ask. Well, for the cake we turn to a 'perfect genoise' batter and as the book points out, "...the genoise is to a French baker what the sponge cake is to the American baker...". It's also, apparently, the first cake a French patissier learns to make!!


However, in practical terms, it also means this cake does not use any leavening agent like baking powder/soda to help it rise. It does that with the help of the eggs or rather, should I say, on how well you beat the eggs. For the baking technician, that would be beating the eggs till you get '10-second ribbons'...so, in case, you haven't figured it out, this cake is all about technique, technique and technique!! Should you get the technique wrong, be prepared for your cake to fall flat, literally!!!

So, I followed this part of the recipe to the last word and the results were good - the cake rose, did not sink and maintained its height even after cooling down. But, after this the script well all awry. The recipe demands three layers out of this cake i.e. each layer would be a centimetre high. With temperatures soaring and an absolute lack of confidence in my skills, I stuck to two.


And then the recipe asked that we fill the layers with the fruit and cream and then cover the cake on the top and its sides with more cream and if that wasn't enough, we also had to pipe cream rosettes for decoration. For someone who is not a big fan of cream, I read on in absolute horror!!

But, my problem was something even more fundamental. To cover the cake with cream, we need to whip it and for that we need double cream, something that is not easily available in India in the packaged form. All we get is packaged low-fat cream which just can not be whipped into submission. Many a home baker before me has tried and failed... and as for yours truly, I tried whipping the cream for close to an hour before finally throwing in the towel in utter exasperation and frustration!!


With no choice left, I simple decided to sandwich a layer of mango and cream between the two layers and then dust some icing sugar on top. The heat (the temperature that day was 41 deg C), the excessive emphasis on the technique of how the cake had to be made and then my run-in with the cream, I was more than happy to be just done with this recipe!!!

My verdict - for all the fuss that this recipe demands, the cake, I felt, did not live up to the hype!! It felt a tad dry and the mango with its syrup did not do much to help the situation. Maybe the berries would have been better. And while I did not use all the cream as specified, I am not sure I even missed it. I doubt that much cream would have been appreciated in this weather. Not that this cake was bad but I'd say I've had better!!!

Tuesday, 12 June 2012

Eggless Chocolate Cake with Fudge Frosting

The beauty of a mother-daughter relationship is that, as time progresses, a relationship that begins with the conventionality of a parent-child bond blossoms into a beautiful friendship between two women. Like fine wine, it gets better with age, with the ties of love and blood strengthened each day with mutual admiration, trust, respect, tenderness and camaraderie. In my life, it is the one relationship where I can confide without the fear of judgement, cry without the fear of pity, fight without the fear of recrimination, love without the fear of restraint and of course, gossip without the fear of contempt!!

A few days back, it was my mother's birthday and this cake that I share with you is one of her favourites. Ever since I've discovered it, I make it for her birthday each year and am pretty convinced that once you give it a shot, it will be a regular at your home too!!


For the cake, I turn to this absolutely gorgeous, egg less cake recipe that I discovered on one of my favourite blogs, 'Barbara Bakes'. Not for a minute should you think that the lack of eggs compromises the final product of this cake in any way. If any thing, this recipe produces one of the most moist, chocolaty cakes that I've come across. This recipe dates back to the post-War era of rationed supplies and thus, it is does not use butter but oil.

It is also one of the easiest cakes to make. It follows the 'quick bread' method - where the dry ingredients are simply combined with the wet ingredients, there is no creaming, no beating, no sifting .. all you need is a hand whisk to bring together the two sets of ingredients... that simple!!


While not a big fan of butter cream frosting, I turned to this uber-simple, uber-chocolaty and uber-gorgeous fudge frosting by Nigella - my one-stop destination for easy, fuss-free, no-fail and delicious recipes!!

Once made, there is not a single fault that one can find with this cake. The cake is beautifully moist, chocolaty and light. The frosting just takes it up a notch higher on the scale of 'chocolate love'. This cake holds its own even without the frosting as I usually keep the frosting only for special occasions.


Every time I make this cake, it has always been appreciated and complimented. Considering the ease with which this cake is made, it makes this recipe even more of a winner. And don't just take my word for it....

A while back, I sent this recipe to an old, school friend who was looking for an easy chocolate cake recipe. She mailed back, effusive with gratitude and appreciation and in her words..."this cake has become the biggest hit with all my friends and family.... it has also set a high standard of what people expect from me...!!!". With such high praise, this cake demands that you give it a shot!!


And before I sign off, I share with you three important lessons of life that I've learnt from my mother -- Live your life truthfully with no pretence, face adversity with dignity and no matter how old you are, never stop in your quest to learn new things and expand your horizons!!!

Happy Birthday Mama .. While I might be the single biggest cause of all your white hair, I am simply blessed to have you as my mother!!


Related Posts Plugin for WordPress, Blogger...