Tuesday, 2 October 2012

Cranberry-Walnut-Pumpkin Loaf : "TWD : Baking with Julia"

Although America has a grand tradition of baking with pumpkin around this time of the year, the idea has never really appealed to me. It's not that we don't get pumpkins in India. Oh we do and plenty of it!! Drive through the rural countryside and you will see them growing on a vine along the roofs of people's homes!! But it's largely cooked as a savoury dish and for someone who till very recently thought about baking only in terms of chocolate, the very idea of pumpkin in a cake was a bit off-putting, to be honest.

But lately, I have been intrigued ... I have seen pumpkin pies, muffins, cheesecakes, candy, bread, cake on every other blog I've been to in the past two weeks ...I've read the recipes, gawked at the photographs and finally, told myself 'the time has come'!! So, this week's 'TWD:Baking with Julia' choice of recipe, Cranberry-Walnut-Pumpkin Loaf, could not have come at a more opportune time!!

 
The recipe is a yeasted bread dough that has roasted pumpkin puree, egg, toasted walnuts, raisins and cranberries (I used dried ones) added to it. Much like the brioche dough that we used for these buns, the dough is kept overnight in the refrigerator after one rise and before it is rolled into shape for the second rise.
 
This is an extremely sticky and wet dough to work with but apart from that there is nothing difficult about this recipe. However, with all the waiting required, it does take almost a day to make from the time you first start.

 
The dough rises beautifully and because of the presence of the egg, it bakes into a beautiful golden-brown crust, complete with some of the cranberries peeking out from the top. It helps that with the cinnamon and nutmeg present in the dough, your kitchen smells beautiful!!
 
As for the taste, no, you do not taste the pumpkin. My question.. is that normal, for when you bake with pumpkin?? Is it just there for texture and volume and not so much for flavour??? But apart for that, this bread is along the lines of a sweet fruit bread. With the toasted nuts, sweet raisins, tangy cranberries and cinnamon, it begins to evoke the flavours of Christmas, just a teeny bit!! You can have a slice of it plain or lightly toasted. We preferred the latter option!!

 
My issue with this bread is not so much with the recipe. It is more to do with the fact that with the same flavour combinations, instead of a yeasted dough, this could have been made along the lines of a 'quick bread'. The texture would have been more cake-like, saved us a lot of time and it would have still tasted just as good. In fact, I've seen recipes where orange juice has been added to a similar quick bread .. now, how good would that have been??? Just a thought....  

Sunday, 30 September 2012

Honey-Toasted Muesli

Read food blogs and you'll notice one thing - food bloggers have this common tendency to re-create a supermarket-bought product at home (think jams, sauces, vanilla extract) and then go on to write about how easy it was to make it. About how much better the home-made stuff tastes compared to the "awful" and "over-priced" versions in supermarkets and then invariably, the post will end with the words "make this once and you will never go back to the shop-bought version" or something along those lines!!! And without doubt, topping that list of products is home-made muesli and granola!!
 
Since, I now consider myself a bonafide food blogger, I thought I would let myself into this Martha Stewart-esque world to see what the fuss was all about. My first stop was going to be ...  why muesli, of course!!!


Scour the Internet and there are literally hundreds of muesli and granola recipes. The difference between muesli and granola is that while they both contain oats and dried fruits, granola has oil and honey added, making it more crisper and sweeter. I took the middle path and since, I still had some honey left over from when I made this bread, I went with this recipe of honey-toasted muesli that I had seen on Masterchef Australia!!

The recipe can't get any simpler .. weigh out all the ingredients in a baking tray, toss them around, drizzle some honey on it, in to the oven for 15 minutes and the aroma from the oven will tell you that you are done!!! You know that, more often than not, the recipes I blog about are fuss-free and hardly take any time. But even by my standards, this seemed a bit too simple ... I actually re-read the recipe twice to check if I had missed out any steps. Nope, it turns out.. that is all there is to it!!!


But, does it really taste any better than the shop-bought stuff. Here's the thing .. make muffins at home and then buy some from a supermarket (not some fancy bakery). There will be a difference, the home-made ones will feel and taste fresher, less greasier and you will taste flavours besides, just sugar!! It is the same deal with this muesli.

Personally, I have always found store-bought muesli a bit chalky and this is where the home-made stuff triumphs. You can discern each and every component - their texture, their flavour, their shape and their colour .. all of it!! In simple terms, it's all that much fresher!!!  


Make it at home and you can play around with the ingredients. Omit the stuff you can't stand and add in the stuff you love!! There are no rules. Search the Web for inspiration or make your own mix.
 
I do realise that while people see the benefits of making stuff at home, sometimes, with the pressures of work and life, it is just more convenient to buy stuff from the supermarket. It's just that much more practical!! But in this case, I'll make a case for this muesli a bit stronger... all it will take you is 20 minutes from start to finish to get a week's supply of breakfast!!! And this will sound cliched .. but it's 20 minutes well spent!!!


Personally, muesli is not so much for breakfast but for my 4 pm hunger cravings, that special time of the day when all my good diet behaviour of the day comes undone!! A bowl of this with some yoghurt is the option I highly recommend. 
 
And yes, I admit .. I've enjoyed this little foray of mine into the world of making home-made supermarket stuff. Next stop.... home-made vanilla extract!!!

Sunday, 23 September 2012

Roasted Peppers, Feta and Thyme Tart

The monsoon is on its way out, here in India. In an ironical contrast to the western hemisphere where temperatures are on their way down, the mercury in fact rises for a month or so, and then sometime in late October, you wake up one fine morning, to a certain nip in the air!! So, before the cold, cosy and snuggly days of winter, we have a spot of hot, muggy  and uncomfortable days. And for days like this, I share with you this light and vibrant tart.

 
This recipe is from one of my favourite baking books, written by Isidora Popovic, the lady behind London's famous Popina bakery. The highlight of this book, for me, is how the author uses fresh, seasonal produce along with healthier pantry ingredients in a way that not only enhances their flavour but celebrates them.

Accompanied with beautiful photographs that exude a certain rustic charm, the recipes are packed with bags of flavour that speak directly to the heart of the home baker and not a single recipe that I have tried till date has disappointed!! In fact, my very first post on this blog was adapted from the book!!


This tart is a light, refreshing alternative to the traditional tart as we know it. The buttery, short-crust pastry makes way for a lighter, healthier, olive oil pizza-dough crust. And in the filling, the egg-cream mixture is replaced by a much-appreciated Greek yoghurt-cheese (Feta and Cheddar) filling. The filling is further enhanced by the addition of roasted peppers, onions and herbs.


You know you are on to a winner, when you pop the vegetables to roast in the oven and the aroma that permeates your kitchen instantly transports you to the Mediterranean coast. And it definitely does not disappoint when it comes out of the oven. With its pizza-dough crust, it will remind you of a deep dish pizza, albeit a lighter, healthier version.

When I say it is packed with flavours, I am not exaggerating. The natural sweetness of the roasted vegetables contrasts with the sharpness of the cheese and the tanginess of the yoghurt mixture. It is then quietly helped along by the fainter notes of the garlic and the fresh herbs. Each of the components retain their unique flavour and yet come together to create this vibrant, refreshing, flavourful tart that will leave you feeling surprisingly light and satiated at the same time.


Cut yourself a slice of this tart, sit back, savour it and wash it down with an ice-cold beverage. Depending on which part of the world you live in...you'll either be wistfully looking back at summer or if you live near the tropics as I do, you can't wait to start counting down to winter!!

Sunday, 9 September 2012

Orange and Honey Tea Bread

For someone who has always struggled with her metabolism, it's been a gradual change, over the past few years, to start eating healthy. It started disastrously with me trying out a few non-sensical diets only to realise that the sensible way was to make small, meaningful changes to my eating habits.

You've heard it before..making breakfast the most important meal, smaller meals at regular intervals, more whole grains, less refined sugar and the one I've really taken to, eating seasonal produce but more importantly, local produce!!


While baking is the occasional indulgence that I really enjoy, it is also at odds with most of the above. So, in my own little way, I try to make it healthier....baking more with fruit, finding a substitute for refined, white sugar and ultimately, I hope to embrace gluten-free baking!!
 
So, when I came across a jar of honey from one of India's trusted organic brands, I knew I wanted to bake with it. This tea bread recipe was perfect. It uses only honey, no refined sugar, two tablespoons of butter and a seasonal fruit, oranges!!


As most of the recipes I blog about, this is an easy one. What I really liked about this recipe was that it not only uses orange zest but also a generous helping of orange juice. And that's why your kitchen and home will be filled with the gentle, beautiful waft of oranges as this loaf bakes and more so, when you take it out of the oven! 


If my earlier lime cake was all about limes, this one is all about oranges. The flavour of the orange lends a certain citrusy freshness to this variation of the basic pound cake. The honey brings a certain denseness of flavour when compared to that of refined, white sugar.

The oranges and honey also keep the cake from being overly sweet, something that my palate appreciates. The recipe does call for walnuts which despite having them at home, I just forgot to use. When I think of it, I recommend the walnuts. It will enhance the loaf, both texturally and visually.


This is a no-frills, fuss-free loaf that can be made on a lazy weekend morning .. it hardly takes any time!! And then watch as you reach for it, slice by slice .... when you have your morning cuppa ... when you have your evening cuppa ... when you come home after running through your list of errands for the weekend ... when you wake up from your afternoon siesta that happens only on the weekends ... when in the middle of a movie that you are watching for the umpteenth time on TV ... when the gossip during your telephone chat gets unbelievably juicy ... when you close your eyes on Sunday evening and think about Monday morning... until you finally reach out... and there is none left!!!

Tuesday, 4 September 2012

Apple Upside-Down Chiffon Cake : "TWD : Baking with Julia"

The good thing about the 'TWD : Baking with Julia' group, and I have said this before, is that it regularly pushes me out of my comfort zone and compels me to try out new techniques. I doubt I would have ever tried today's upside-down chiffon cake if the group hadn't chosen it for this fortnight's post. In my ignorance, I assumed it was one of those cakes that would require elaborate technique to achieve a chiffon-like texture and lightness, something I believed was beyond my patience threshold. And as always, I was wrong!!


Turns out, the chiffon cake gets its lightness by beating the egg whites to a meringue consistency which is then incorporated into the flour batter to lighten it. This is extremely important because the cake uses oil instead of butter and as oil cannot be whipped, the cake relies on the meringue to achieve its characteristic springy texture.
 

This particular recipe that we followed added a few 'bells and whistles' to a regular chiffon cake. At the bottom, we had a layer of fruit, melted butter and brown sugar that goes on to become a layer of caramelised fruit topping when this cake is turned upside down. There is also a crunchy, streusel layer of toasted nuts, oats and cinnamon that is centered between the two layers of the cake.
 
The recipe promised flavours of lemon, cinnamon, nuts and caramel. So when it came to choosing a fruit to substitute the nectarines, I went with apples, best friends with all the mentioned flavours.


Making this cake is not tough, it is just time-consuming to get all the components done. But worry not, for you will be well recompensed for all your efforts. The beauty of this cake is that no one flavour or component seeks to dominate or overwhelm your palate. On their own, each component will not please but when combined all together in this cake, it is a symphony of flavours and textures!!
 
Once cooled and unmoulded, the sweet, caramel fruit layer is never overpoweringly sweet as it is tempered by the nutty and cinnamon flavours and textures of the streusel. And bringing it all together, is that cake base that has a mellow, lemon flavour that compliments its light, springy texture. In fact, it is a hint of that lemon that stays with you in the after taste of this cake.


It took me an entire afternoon to get all the components of the cake done. I chose an afternoon when the weather played truant and I was forced indoors all day. Luckily for me, this cake is perfect for those days when the rain gods reign supreme. And then only a slice of this warm cake with its caramelised apples and toasty streusel served with a dollop of vanilla ice-cream can beat the weather blues away!!!


Monday, 27 August 2012

Pitcaithly Bannock - Scottish Shortbread

A few weeks after I started blogging, my flatmate from University, Becca wrote to me. She had just had a closer look at my posts and recipes and was wondering if I would be interested in a family recipe. "Yes, please!!!", I replied back. And she sent me the recipe for a Scottish shortbread, know as Pitcaithly Bannock.


Back in University, Becca was the native British girl who alternated between being amused and outraged at the ways of her eccentric flatmates, including yours truly, who came from every inhabited continent of this world, except Australia. She is now married to a wonderful Scottish man whom she met, coincidentally, when we were flatmates. She was a student of English literature with a focus on 17th century Erotica and he, a student of history, with a special interest in Medieval Piracy!! Boring is obviously not a word that exists in this couple's dictionary!!!

And they served this bannock at their wedding. But what caught my attention was the fact that "Pitcaithly" in the recipe title was also her husband's family name. This was truly a family recipe!!


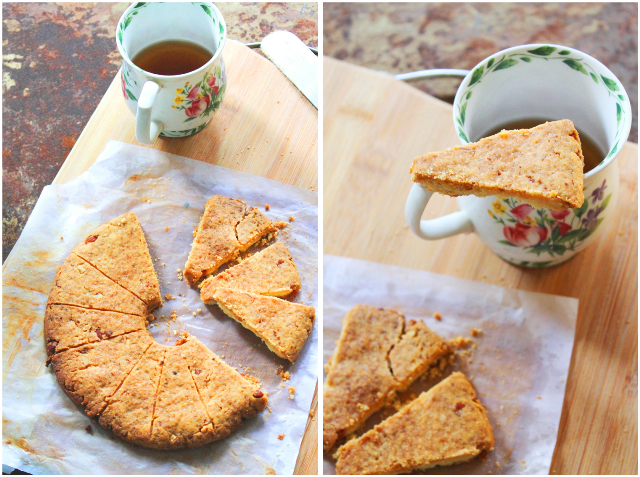
This is a straight forward shortbread recipe with the standard ingredients being flour, sugar and butter. The difference in the recipe is the addition of almonds and candied mixed peel. The only minor change that I made was to toast the almonds to enhance their nuttiness.
 
Putting together this recipe is simple, as with any shortbread recipe. However, when it came to their shape, I wanted to do something different. Last week, I came across the idea of shaping the dough into a round and then scooping out a small circle from the centre. It gives the shortbread a slightly different shape from the regular. I got the idea from the blog that has me captivated with its outstanding photographs and recipes. It is written by a Russian woman in Texas and is aptly titled, "From Red Star to Lone Star"!!


These shortbread are everything a shortbread should be - buttery and crumbly and perfect with a cup of tea!! The addition of the roasted almonds and candied peel are interesting and something you might want to keep in mind the next time you bake shortbread!!

Do remember the shortbread hardens as it cools, so you might want to take them out in time or else you risk them becoming rock hard!! I confess that I might have baked these a few minutes longer than was necessary as this batch was slightly crisper than normal.


The Pitcaithly bannock is traditionally made at the beginning of August to coincide with the Lammas feast, marking the transition from summer to autumn and the beginning of the Scottish harvest festival. But, I had a better reason to make these this August. Simple...this August, Mr and Mrs Pitcaithly celebrate their first wedding anniversary!!!

Tuesday, 21 August 2012

Popovers : "TWD : Baking with Julia"

Every once in a while, I come across a baking recipe that I've never tasted, seen or for that matter, even heard of!! Popovers, today's choice for the TWD:Baking with Julia group, falls in that category. I didn't even know whether it was a cookie, a cake or a bread!!

Initial research on the Web revealed that it was the American equivalent of Yorkshire Puddings. That wasn't really helpful ... I've never had Yorkshire Pudding!! A little more digging around and it turns out, it is a "light, hollow roll", that maybe had at breakfast or afternoon tea with a drizzle of honey and butter. It can also be had with roasts and meats for dinner or lunch.


It is made with a simple milk-flour-egg batter that is poured into muffin tins, or if you have it, a special popover pan. Once placed in the oven, within few minutes, the batter expands and puffs out of the moulds. The end result should be a golden-brown roll that has a crisy, puffed-up crown that is hollow in the middle and has a slight custard-like interior!!

There was no way I was going to get a popover pan in India and so, went ahead with a muffin tin. The process is a simple one. Simply whizz together all the ingredients in a bowl, pour the mixture into the moulds and then pop them in to the oven.


As promised, within a few minutes, the batter puffed up and popped out of the moulds. Everything was going according to script. It is when I pulled them out that I got confused. I had the crispy, puffed up tops. I had the hollow interiors. It even seemed that the interiors could be called 'custard-like'. But, most of them had puffed up so much that when I got them out of the moulds, there didn't have any bottoms... they had the sides.. but no bottoms!! Yikes, that can't be right, I thought!! Could someone clarify if that can actually happen or did I do something wrong!??!

But, how did they taste, you ask?? I drizzled a bit of honey on them  and had a bite. First impressions, they were a bit too eggy for my liking. And then when I thought about it a bit more, I realised that if I took a bite of it with the honey, with my eyes closed, I would have probably thought it was something close to a french toast!!


Dorie Greenspan writes in the book how Popovers conjure up childhood memories for many Americans. In her words, it is "the messy thrill of eating popovers dripping with butter and honey". Unfortunately, I could not quite see their appeal. I did not love 'em or hate 'em but they left me feeling rather confused. I just didn't see the point of them!! I put it down as a learning experience and am ready to move on!!
Related Posts Plugin for WordPress, Blogger...